Data spaces
All user data are stored on file systems reachable from the supercomputer login and compute nodes. Each file system has a purpose: your HOME directory contains user configuration, your SCRATCH directory is intended for temporary computational data sets, etc. To prevent over-usage of the file system capacities, limitations/quotas are set on data space allocated to users or groups. Except for your HOME directory, which is hosted by a NFS file system, user data spaces are stored on Lustre file systems. This section provides data usage guidelines that must be followed, since an inappropriate usage of the file systems might badly affect the overall production of the computing center.
Available file systems
This section introduces the available file systems with their purpose, their quota policy and their recommended usage.
| File System | Personal | Shared |
|---|---|---|
| Home | $CCCHOME
$OWN_HOME
$CCFRHOME
$OWN_CCFRHOME |
$ALL_CCCHOME
$ALL_CCFRHOME
$<SHSPACE>_ALL_CCCHOME
$<SHSPACE>_ALL_CCFRHOME
$<SHSPACE>_ALL_HOME
$OWN_ALL_CCCHOME
$OWN_ALL_CCFRHOME
$OWN_ALL_HOME |
| Scratch | $CCCSCRATCHDIR
$OWN_CCCSCRATCHDIR
$CCFRSCRATCH
$OWN_CCFRSCRATCH |
$ALL_CCCSCRATCHDIR
$ALL_CCFRSCRATCH
$<SHSPACE>_ALL_CCCSCRATCHDIR
$<SHSPACE>_ALL_CCFRSCRATCH
$OWN_ALL_CCCSCRATCHDIR
$OWN_ALL_CCFRSCRATCH |
| Work | $CCCWORKDIR
$OWN_CCCWORKDIR
$CCFRWORK
$OWN_CCFRWORK |
$ALL_CCCWORKDIR
$ALL_CCFRWORK
$<SHSPACE>_ALL_CCCWORKDIR
$<SHSPACE>_ALL_CCFRWORK
$OWN_ALL_CCCWORKDIR
$OWN_ALL_CCFRWORK |
| Store | $CCCSTOREDIR
$OWN_CCCSTOREDIR
$CCFRSTORE
$OWN_CCFRSTORE |
$ALL_CCCSTOREDIR
$ALL_CCFRSTORE
$<SHSPACE>_ALL_CCCSTOREDIR
$<SHSPACE>_ALL_CCFRSTORE
$OWN_ALL_CCCSTOREDIR
$OWN_ALL_CCFRSTORE |
HOME
The HOME is a slow, small file system with backup that can be used from any machine.
Characteristics:
- Type: NFS
- Data transfer rate: low
- Quota: 5GB/user
- Usage: Sources, job submission scripts…
- Comments: Data are saved
- Access: from all resources of the center
- Personnal variables:
$CCCHOME$OWN_HOME$CCFRHOME$OWN_CCFRHOME - Shared variables:
$ALL_CCCHOME$ALL_CCFRHOME$<SHSPACE>_ALL_CCCHOME$<SHSPACE>_ALL_CCFRHOME$<SHSPACE>_ALL_HOME$OWN_ALL_CCCHOME$OWN_ALL_CCFRHOME$OWN_ALL_HOME
Note
- HOME is the only file system without limitation on the number of files (quota on inodes)
- The retention time for HOME directories backup is 6 months
- The backup files are under the
~/.snapshotdirectory
SCRATCH
The SCRATCH is a very fast, big and automatically purged file system.
Characteristics:
- Type: Lustre
- Data transfer rate: 300 GB/s
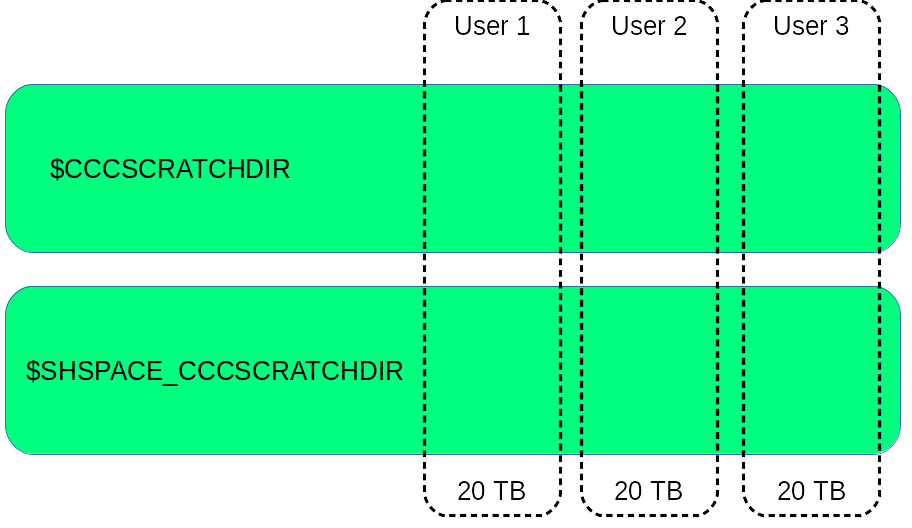
- Quota: The quota is defined by group. The command ccc_quota provides information about the quota of the groups you belong to. By default, a quota of 2 millions inodes and 100 To of disk space is granted for each data space.
- Usage: Data, Code output…
- Comments: This filesystem is subject to purge
- Access: Local to the supercomputer
- Personnal variables:
$CCCSCRATCHDIR$OWN_CCCSCRATCHDIR$CCFRSCRATCHDIR$OWN_CCFRSCRATCHDIR - Shared variables:
$ALL_CCCSCRATCHDIR$ALL_CCFRSCRATCHDIR$<SHSPACE>_ALL_CCCSCRATCHDIR$<SHSPACE>_ALL_CCFRSCRATCH$OWN_ALL_CCCSCRATCHDIR$OWN_ALL_CCFRSCRATCH
The purge policy is as follows:
- Files not accessed for 60 days are automatically purged
- Symbolic links are not purged
- Directories that have been empty for more than 30 days are removed
Note
- You may use the ccc_will_purge command to display the files to be purged soon. Please read the dedicated section for more information
WORK
WORK is a fast, medium and permanent file system (but without backup):
Characteristics:
- Type: Lustre via routers
- Data transfer rate: high (70 GB/s)
- Quota: 5 TB and 500 000 files/group
- Usage: Commonly used file (Source code, Binary…)
- Comments: Neither purged nor saved (tar your important data to STORE)
- Access: from all resources of the center
- Personnal variables:
$CCCWORKDIR$OWN_CCCWORKDIR$CCFRWORK$OWN_CCFRWORK - Shared variables:
$ALL_CCCWORKDIR$ALL_CCFRWORK$<SHSPACE>_ALL_CCCWORKDIR$<SHSPACE>_ALL_CCFRWORK$OWN_ALL_CCCWORKDIR$OWN_ALL_CCFRWORK
Note
- WORK is smaller than SCRATCH, it’s only managed through quota.
- This space is not purged but not saved (regularly backup your important data as tar files in STORE)
STORE
STORE is a huge storage file system
Characteristics:
- Type: Lustre + HSM
- Data transfer rate: high (200 GB/s)
- Quota: 50 000 files/group, expected file size range 10GB-1TB
- Usage: To store of large files (direct computation allowed in that case) or packed data (tar files…)
- Comments: Migration to hsm relies on file modification time: avoid using cp options like
-p,-a… - Access: from all resources of the center
- Personnal variables:
$CCCSTOREDIR$OWN_CCCSTOREDIR$CCFRSTORE$OWN_CCFRSTORE - Shared variables:
$ALL_CCCSTOREDIR$ALL_CCFRSTORE$<SHSPACE>_ALL_CCCSTOREDIR$<SHSPACE>_ALL_CCFRSTORE$OWN_ALL_CCCSTOREDIR$OWN_ALL_CCFRSTORE - Additional info: Use ccc_hsm status <file> to know whether a file is on disk or tape level, and ccc_hsm get <file> to preload file from tape before a computation
Note
- STORE has no limit on the disk usage (quota on space)
- STORE usage is monitored by a scoring system
- An HSM is a data storage system which automatically moves data between high-speed and low-speed storage media. In our case, the high speed device is a Lustre file system and the low speed device consists of magnetic tape drives. Data copied to the HSM filesystem will be moved to magnetic tapes (usually depending on the modification date of the files). Once the data is stored on tape, accessing it will be slower.
- To fetch and store big data volumes on the Store, you may use the ccc_pack command. Please see the dedicated subsection for more information.
TMP
TMP is a local, fast file system but of limited size.
Characteristics:
- Type: zram (RAM)
- Data transfer rate: very high (>1GB/s) and very low latency
- Size: 16 GB
- Usage: Temporary files during a job
- Comments: Purge after each job
- Access: Local within each node
- Variable:
CCCTMPDIRorCCFRTMP
Note
- TMP allow fast write and read for local needs.
- TMP is local to the node. Only jobs/processes within the same node have access to the same files.
- Write files in TMP will reduce the amount of available RAM.
SHM
SHM is a very fast, local file system but of limited size.
Characteristics:
- Type: tmpfs (RAM, block size 4Ko)
- Data transfer rate: very high (>1GB/s) and very low latency
- Size: 50% of RAM
- Usage: Temporary files during compute; can be used as a large cache
- Comments: Purge after each job
- Access: Local within each node
- Variable:
CCCSHMDIR
Note
- SHM allow very fast file access.
- SHM is local to the node. Only jobs/processes within the same node have access to the same files.
- Write files in SHM will reduce the amount of available RAM.
- Using the SHM folder through the CCCSHMDIR variable is strongly recommended, especially for small files.
Warning
CCCSHMDIR is only available during a SLURM allocation (ccc_msub). CCCSHMDIR is not available in an interactive session (ccc_mprun -s).
Warning
Using CCCSHMDIR is necessary in jobs to make sure data are properly cleaned at job end. It may cause node deadlocks otherwise.
Quota
Because file systems are shared between many users, restrictions are enforced on disk usage. The disk quotas and your current usage (space and number of files or directories) are shown by the command ccc_quota. This command also displays a score rating your usage on Lustre + HSM file systems (“Account scoring”).
$ ccc_quota
Disk quotas for user <login> (uid <uid>):

          ============ SPACE =============  ============ INODE =============
 Filesystem     usage    soft    hard   grace   entries    soft    hard   grace
 ----------  -------- ------- ------- -------  -------- ------- ------- -------
       HOME     2.34G      5G      5G       -    48.01k       -       -       -
    SCRATCH    78.96G       -       -       -     1.19M       -       -       -
       WORK     36.7G       -       -       -    13.13k       -       -       -
      STORE       40k       -       -       -        10       -       -       -

Disk quotas for data space <group> (gid <gid>):

          ============ SPACE =============  ============ INODE =============
 Filesystem     usage    soft    hard   grace   entries    soft    hard   grace
 ----------  -------- ------- ------- -------  -------- ------- ------- -------
       HOME         -       -       -       -         -       -       -       -
    SCRATCH     2.01T    100T  100.1T       -     1.24M      2M   2.05M       -
       WORK     6.08T     10T     10T       -     3.13M      5M      5M       -
      STORE   104.13M       -       -       -     7.73k     50k   50.5k       -

STORE filesystem scoring for group <group> (gid <gid>):

 ================= SPACE ================  ============== INODE ===============
    usage files<500M  files<1G  avg_fsize   entries     dir  symlink  non_files
 -------- ---------- --------- ----------  -------- ------- -------- ----------
   10.07T     69.53%    69.58%      1.48G     7.73k     755        0      9.76%
          ---------- --------- ----------                            ----------
                 1/7 +     1/3 +      3/4                            +      6/6
          ==================================== TOTAL SCORE: 11/20 =============
Disk quotas
Three parameters govern the disk quotas:
- soft limit: when your usage reaches this limit you will be warned.
- hard limit: when your usage reaches this limit you will be unable to write new files.
- grace period: the period during which you can exceed the soft limit.
Within the computing center, the quotas have been defined as follows:
- the grace period is 1 week. It means that once you have reached the soft limit, a countdown starts for a week. By the end of the countdown, if you have not brought your quota under the soft limit, you will not be able to create new files anymore. Once you get back under the soft limit, the countdown is reset.
- soft limit and hard limit are almost always the same, which means that checking your current usage to be below this limit is enough.
- those limits have been set on both the number of files (inode) and the data usage (space) for WORK and SCRATCH.
- those limits have been set only on the data usage (space) for HOME.
- those limits have been set only on the number of files (inode) for Lustre + HSM file systems (CCCSTOREDIR).
- Lustre + HSM file systems (CCCSTOREDIR) have a scoring system instead of space limitations.
Note
The section Disk quotas displayed by ccc_quota is updated in real-time.
Account scoring
On Lustre + HSM file systems (CCCSTOREDIR), a score reflects how close you are from the recommended usage.
4 criteria are defined and are each granted a certain amount of points. Here are those criteria:
- inodes should be regular files (not directories nor symbolic links) for 6 points. With limits of 10%, 25%, 20%, 30%, and 50%, you will lose one point for each limit exceeded. With a percentage of 20.74% “non_files” you will have a subscore of 3 points;
- files should be bigger than 500MB for 7 points. With limits of 10%, 20%, 30%, 40%, 50%, 60%, and 70%, you will lose one point for each limit exceeded. With 67.20% of small files (<500M) you will have a subscore of 1;
- files should be bigger than 1GB for 3 points. With limits of 25%, 60%, and 75%, you will lose one point for each limit exceeded;
- the average file size should be high enough for 4 points. With limits of 64MB, 128MB, 1GB, and 8GB, you will gain one point for each limit. With an average file size of 2GB you will have a subscore of 3 points out of 4.
The command ccc_quota shows how well you match the criteria in the Account Scoring section:
- current usage (space and inodes)
- percentages of files not matching the criteria
- global score and the subscores.
Here is an example of scoring:
STORE filesystem scoring for group <group> (gid <gid>):

 ================= SPACE ================  ============== INODE ===============
    usage files<500M  files<1G  avg_fsize   entries     dir  symlink  non_files
 -------- ---------- --------- ----------  -------- ------- -------- ----------
   16.97T     92.09%    92.33%       626M    35.87k    6235     1204     20.74%
          ---------- --------- ----------                            ----------
                 0/7 +     0/3 +      2/4                            +      3/6
          ====================================  TOTAL SCORE: 5/20 =============
- For instance, for the criteria “non_files”, the score is of 3 out of 6
- The related number is 20.74%: this is the proportion of your inodes that are directories of links.
- These 20.74% represent three points lost out of 6
- The subscore of the criteria is computed and is then 3/6
- Finally all subscores are summed and constitute a global score
ex: (0+0+2+3)=5 points over (7+3+4+6)=20, that is to say 5/20
Note
The section Account Scoring displayed by ccc_quota is updated daily (around 13:00 CET/CEST).
Data protection
Warning
Please refer to internal technical documentation to get information about this subject.
Personal Spaces
Every user of the computing center has a personal space in their primary work group, on each available filesystems: NFS home, local and global Lustre filesystems.
The command ccc_home displays the personal directories for your login.
$ ccc_home -h
ccc_home: Print the path of a user directory (default: home directory).
usage: ccc_home [ -H | -s | -t | -W | -x | -A | -a | -n] [-u user] [-d datadir]
             [-h, --help]
-H, --home            :  (default) print the home directory path ($HOME)
-s, -t, --cccscratch  :  print the CCC scratch directory path   ($CCCSCRATCHDIR)
-X, --ccchome         :  print the CCC nfs directory path ($CCCHOMEDIR)
-W, --cccwork         :  print the CCC work directory path  ($CCCWORKDIR)
-A, --cccstore        :  print the CCC store directory path ($CCCSTOREDIR)
-a, --all             :  print all paths
-u user               :  show paths for the specified user instead of the current user
-d datadir            :  show paths for the specified datadir
-n, --no-env          :  do not load user env to report paths
-h, --help            :  display this help and exit
By default, members of the same work group have read access to each other’s personal spaces.
Shared Spaces
A shared space is a powerful tool to share environment, installations and results between users or a community. It mainly consists of data storage with additional tools to enhance or manage it. Shared spaces may be used within a community to share:
- Data: input files, configuration files, results, logs
- Products or compute codes
Accessibility and procedures
Warning
Please refer to internal technical documentation to get information about this subject.
Implementation
File systems
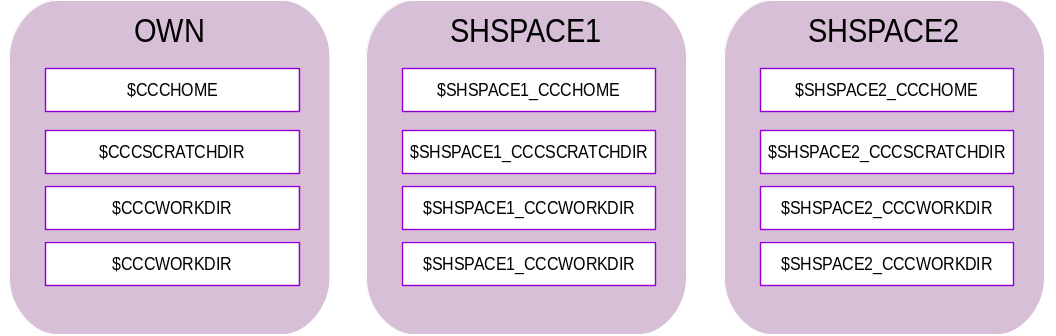
Regarding file systems, a shared space is like the already existing personal space: it is spread over 4 different file systems (HOME, CCCSCRATCH, CCCWORK and CCCSTORE). For a shared space called SHSPACE, the names to access the 4 different storage spaces will be:
$<SHSPACE>_HOMEor$<SHSPACE>_CCFRHOME$<SHSPACE>_CCCSCRATCHDIRor$<SHSPACE>_CCFRSCRATCH$<SHSPACE>_CCCWORKDIRor$<SHSPACE>_CCFRWORK$<SHSPACE>_CCCSTOREDIRor$<SHSPACE>_CCFRSTORE
Those environment variables also exist for your personal space: they are named OWN_HOME, OWN_SCRATCHDIR, etc. and are defined in your default environment.
Note
You may be a member of several shared spaces.
Shared storage space
Limitations and quota
Several limitations rule a shared space:
- It cannot be shared between users of different containers
- It is not a user account and it does not come with computing hours
Please note that shared file systems have no specific quota. The inodes stored on any file system will impact the quota of their owner.
Shared space quota
Unix groups
Warning
Please refer to internal technical documentation to get information about this subject.
Tools
The computing center provides several tools to ease usage and management of shared spaces.
- The datadir/<shspace> and dfldatadir/<shspace> modules offer set environment variables that simplify access to the shared storage spaces.
- The extenv/<shspace> module helps using shared products or computing codes.
- The scripts ccc_shspace_chmod and ccc_shspace_modck, along with the module collwork, allow to test and set the unix permissions of files and directories in the shared space.
module datadir/dfldatadir
The modules datadir and dfldatadir set environment variables that point to the various storage spaces. Versions of those modules exists for your personal space (own, usually loaded by default), and for each shared space you are member of.
- The datadir module sets an environment variable for each data directory available. Several versions of datadir may be loaded simultaneously in your environment.
The example below shows the default module datadir/own and the impact of loading datadir/shspace:
$ module list
Currently Loaded Modulefiles:
1) ccc 2) datadir/own 3) dfldatadir/own

$ echo $OWN_CCCWORKDIR
/ccc/work/contxxx/grp1/user1

$ module load datadir/shspace
load module datadir/shspace (Data Directory)

$ echo $SHSPACE_CCCWORKDIR
/ccc/work/contxxx/shspace/shspace
- The dfldatadir module sets the default environment variables for the various storage spaces (
CCCSCRATCHDIR,CCCWORKDIR,CCCSTOREDIRand their CCFR equivalent).
Only one version of dfldatadir can be loaded at a time.
This example shows how to use dfldatadir:
$ module list
Currently Loaded Modulefiles:
1) ccc 2) datadir/own 3) dfldatadir/own

$ echo $CCCWORKDIR
/ccc/work/contxxx/grp1/user1
By default, $CCCWORKDIR (and its CCFR’s equivalent $CCFRWORK) points to your own work directory.
$ module switch dfldatadir/own dfldatadir/shspace
unload module dfldatadir/own (Default Data Directory)
unload module datadir/own (Data Directory)
load module dfldatadir/shspace (Default Data Directory)
Once dfldatadir/shspace is loaded instead of dfldatadir/own, $CCCWORKDIR (and $CCFRWORK) points to your own work directory shared within the shspace.
$ echo $CCCWORKDIR
/ccc/work/contxxx/shspace/user1
Generic shared variables are set by the dfldatadir module and point to the datadir/shspace variables without mentioning a specific shspace name. This can be useful in order to create generic scripts adapted to different projects.
$ echo $ALL_CCCWORKDIR
/ccc/work/contxxx/shspace/shspace
Environment extension
The extenv module extends the current user environment. It defines a common environment for all users of a shared space.
Loading the extenv module will:
- Set environment variables defining the path to shared products and module files (
SHSPACE_PRODUCTSHOME,SHSPACE_MODULEFILES,SHSPACE_MODULESHOME) - Execute an initialization script
- Add shared modules to the available modules
The environment extension mechanisms uses specific paths. Products installed in the <shspace> shared space should be installed in $SHSPACE_PRODUCTSHOME and the corresponding module files should be in $SHSPACE_MODULEFILES.
Initialization file
If a file named init is found in the path defined by $SHSPACE_MODULESHOME, then it is executed each time the extenv/<shspace> module is loaded. This may be helpful to define other common environment variables or to add prerequisites on modules to be used by the community.
For instance the following example defines two environment variables: one is the directory containing input files (SHSPACE_INPUTDIR), and the other is the result directory (SHSPACE_RESULTDIR). It also adds $SHSPACE_PRODUCTSHOME/tools/bin to the PATH so that the tools installed in $SHSPACE_PRODUCTSHOME/tools/bin are easily available.
$ cat $SHSPACE_MODULESHOME/init
setenv SHSPACE_INPUTDIR "$env(SHSPACE_CCCWORKDIR)/in"
setenv SHSPACE_RESULTDIR "$env(SHSPACE_CCCSCRATCHDIR)/res"
append-path PATH "$env(SHSPACE_PRODUCTSHOME)/tools/bin"
Modules
After the module extenv/<shspace> is loaded, all the module files located in $SHSPACE_MODULEFILES become visible to the module command. For each product, there should be one module file per version.
For example, if you create specific modules in the shared environment in the following paths:
$ find $SHSPACE_MODULEFILES
/ccc/contxxx/home/shspace/shspace/products/modules/modulefiles
/ccc/contxxx/home/shspace/shspace/products/modules/modulefiles/code1
/ccc/contxxx/home/shspace/shspace/products/modules/modulefiles/tool2
/ccc/contxxx/home/shspace/shspace/products/modules/modulefiles/libprod
/ccc/contxxx/home/shspace/shspace/products/modules/modulefiles/libprod/1.0
/ccc/contxxx/home/shspace/shspace/products/modules/modulefiles/libprod/2.0
Then, those modules will be visible and accessible once the extenv/<shspace> module is loaded.
$ module load extenv/shspace
load module extenv/shspace (Extra Environment)
$ module avail
---------------- /opt/Modules/default/modulefiles/applications -----------------
abinit/x.y.z        gaussian/x.y.z        openfoam/x.y.z
[...]
-------------------- /opt/Modules/default/modulefiles/tools --------------------
advisor/x.y.z       ipython/x.y.z         r/x.y.z
[...]
-------- /ccc/contxxx/home/shspace/shspace/products/modules/modulefiles --------
code1        libprod/1.0        libprod/2.0        tool2

$ module load tool2
$ module list
Currently Loaded Modulefiles:
1) ccc          3) dfldatadir/own   5) extenv/shspace
2) datadir/own  4) datadir/shspace  6) tool2
Let us consider the example of a product installed in the shared space. The program is called prog. Its version is version. It depends on the product dep. The product should be installed in the directory $SHSPACE_PRODUCTSHOME/prog-version. The syntax of its module file $SHSPACE_MODULEFILES/prog/version would be:
#%Module1.0
# Software description
set version     "version"
set whatis      "PROG"
set software    "prog"
set description "<description>"

# Conflict
conflict        "$software"

# Prereq
prereq dep

# load head common functions and behavior
source $env(MODULEFILES)/.scripts/.headcommon
# Loads software's environment

# application-specific variables
set prefix       "$env(SHSPACE_PRODUCTSHOME)/$software-$version"
set libdir       "$prefix/lib"
set incdir       "$prefix/include"
set docdir       "$prefix/doc"

# compilerwrappers-specific variables
set ldflags      "<ldflags>"

append-path PATH "$bindir"
append-path LD_LIBRARY_PATH "$libdir"

setenv VARNAME "VALUE"

# load common functions and behavior
source $env(MODULEFILES)/.scripts/.common
- Setting the local variables
prefix,libdir,incdiranddocdirwill create the environment variablesPROG_ROOT,PROG_LIBDIR,PROG_INCDIRandPROG_DOCDIRwhen the module is loaded. You can also define any environment variable needed by the software as the example does forVARNAME. - Inter module dependencies are now handled automatically with the prereq keyword. That way, any time the module is loaded, its dependencies are loaded if necessary.
We recommend the use of the previous example as a template for all your module files. If you use the recommended path for all installations ($SHSPACE_PRODUCTSHOME/<software>-<version>), you can keep that template as it is. Just specify the right software and version and the potential VARNAME environment variables you want to define for the software.
Using that template will ensure that your module behaves the same way as the default modules and that all the available module commands will work for you.
Module collection
The collection mechanism allows to define a set of modules to be loaded either automatically when starting a session, through the default collection or manually with module restore [collection_name].
Along with datadir, dfldatadir and extenv, the aim of this collections is to replace all users configurations that may have been done up to now in the shell configuration files. (.bashrc, .bash_profile, etc)
Here are the useful commands to manage collections:
- To create a collection containing the modules currently loaded in your environment:
module save [collection_name]
If [collection_name] is not specified, it will impact the default collection.
- To list available collections:
module savelist
- To load a saved collection:
module restore [collection_name]
If [collection_name] is not specified, the default collection will be loaded.
Those collections are stored in the users home, just like shell configuration scripts.
Let us say you have a product Tool2 installed in your shared extended environment. Here is how you would add it to your default collection:
$ module list
Currently Loaded Modulefiles:
1) ccc 2) datadir/own 3) dfldatadir/own
Load all necessary modules to access your shared product correctly.
$ module load datadir/shspace
load module datadir/shspace (Data Directory)
$ module load extenv/shspace
load module extenv/shspace (Extra Environment)
$ module load tool2
load module tool2 (TOOL2)
$ module list
Currently Loaded Modulefiles:
1) ccc         3) dfldatadir/own  5) extenv/shspace
2) datadir/own 4) datadir/shspace 6) tool2
Use module save to make the current environment the default one.
$ module save
After that, every time you will connect to your account, those will be the modules loaded by default.
We highly recommend the use of collections instead of adding calls to module load in shell configuration files. A call to module load takes non negligible time whether the module was already loaded or not. And when they are specified in ~/.bashrc, they run for each bash script or shell execution. On the contrary, a collection is only loaded if the environment has not yet been initialized. Therefore, using collections will fasten connections and script executions.
Note: To ensure the correct setting of your user environment, make sure
- That the file
~/.bashrccontains:
if [ -f /etc/bashrc ]; then
. /etc/bashrc
fi
- That the file
~/.bash_profilecontains:
if [ -f ~/.bashrc ]; then
. ~/.bashrc
fi
Managing permissions
Warning
Please refer to internal technical documentation to get information about this subject.
Parallel file system usage monitoring
Some general best practice rules should be followed when using the available file systems. They are specified in Recommended data usage on parallel file system.
Inappropriate usage of parallel file systems is monitored, as it may badly affect overall performances. Several inappropriate practices are tracked down.
Warning
Non-compliance with the appropriate file system usage guidelines may trigger an alert, requiring immediate user attention and action.
Too many small files on CCCSTOREDIR
Users with more than 500 files on STORE are under monitoring and will be issued E-mail alerts if they have:
- an average file size below 1GB (see the column “avg_fsize” from ccc_quota),
- or the percentage of files smaller than 500MB is higher than 80% (see the column “files<500M” from ccc_quota).
If the STORE rules are not followed, the following measures will be taken until the situation returns to normal:
- Day D: The user is informed by e-mail.
- Day D+14: The user is informed by e-mail and their submissions are locked.
- Day D+28: The user is informed by e-mail, their account is locked and their files may be archived or even deleted.
Too many files in a directory on SCRATCH, WORK and STORE
Having a directory with more than 50000 entries (files or directories) at the root level is inappropriate.
Once a week if this rule is not followed, actions are triggered until situation is improved:
- D0: The user is informed by mail.
- D7: The user is informed by mail.
- D14: The user is informed by mail and his submissions are locked.
- D21: The user is informed by mail.
- D28: The user is informed by mail, his account is locked and his files can be removed.
Data management on STORE
ccc_pack
ccc_pack allows for a storing large volumes of data. Usually, it is used to transfer data from the Scratch to the Store. Here is an example case:
$ ccc_pack --mkdir --partition=<partition> --filesystem=store,scratch --src=$CCCSCRATCHDIR/<source file path>   --dst=$CCCSTOREDIR/<destination directory> -j 2
$ ccc_msub $CCCSTOREDIR/<destination directory>/pack_<ID>.msub
This command is a program to pack sources files or directory according to destination filesystem properties. Current filesystem properties are minimum, optimum, and maximum filesize.
The program will chroot content path in toc and pack to source path. If multiple sources are supplied, files with the same name and relative path will be packed. After packing no information will differentiate them (for extraction).
Symlinks will not be followed by the pack, they will be archived as a symbolinc link. It write a block to the pack naming the target of the link.
During program execution, no source file is locked. If the file is modified, we can not guarantee which version is saved. At the end of execution, files are not deleted. If necessary these actions must be performed by the user.
By default this tool will produce:
- For file less than maximum filesize pack: x packs named basename-part.tar
- For file greater than maximum filesize pack: x packs named basename-part-volume.split
- For each pack: a table of contents basename-part.toc, a file with md5sum of each table elements basename-part.md5, a file with md5sum of each pack basename.md5
If Scheduling is activated, this tool will produce:
- A file with tasks to run in parallel: MOD_PREFIXbasename.glost
- A file to submit: MOD_PREFIXbasename.msub
Note
More options are available, please use ccc_pack --help or man ccc_pack for more information.
ccc_unpack
ccc_unpack is the routine to reverse a pack. Usually, it is used to transfer data back from the Store to the Scratch. Here is an example case :
$ ccc_unpack --src-basename=ID --src=$CCCSTOREDIR/<archive directory> --dst=$CCCSCRATCHDIR/<output dir> --partition=milan -j 2

$ ccc_msub $CCCSTOREDIR/unpack_<ID>.msub
More options are available, please use ccc_unpack --help or man ccc_unpack for more information.
ccc_hsm
ccc_hsm is a tool designed to manage data among multiple levels of storage devices, from Lustre SDDs/HDDs to an archival system such as HPSS or Phobos. ccc_hsm can manage data placement through hints by migrating data within Lustre storage components. It can also trigger the copy of archived data back to Lustre through Lustre-HSM mecanisms. The details of its use is described in the following paragraphs.
ccc_hsm on the STORE
Display status
$ ccc_hsm status <file>
You can use the -T option to also display the storage tiers if the file is
online, or its archive id if released.
Here is an example of an output on the store
$ ccc_hsm status -T test_dir/test_file
test_dir/test_file                  online  (hdd)
In this case, the file is ready to be used.
ccc_hsm status -T test_dir/test_file2
test_dir/test_file2     released
In this case, the file need to be fetched
To show the HSM status of all files in a directory, use the command:
ccc_hsm ls <dir>
In the same way, you can add the -T option to display storage tiers.
Here is an example of an output:
ccc_hsm ls -T test_dir
online   (hdd)           test_dir/test_file_1
online   (flash)         test_dir/test_file_2
released (1)             test_dir/test_file_3
Retrieving data
To retrieve files, you can use the get command to preload the entries into Lustre. The given path to retrieve can also be a directory, in which case additional options are required to specify the behaviour. The command is:
ccc_hsm get <path>
Multiple options can be added:
-r: for recursive get if the given path is a directory-b: to get the data asynchronously in background-d: to only retrieve the first level entries of a directory-n: to only try to preload files once
If the retrieval is blocking (i.e. not using the -b option), it will wait for
the file to be online. However, if the file isn’t online by the time the timeout
is reached, ccc_hsm has no way of knowing why it couldn’t be retrieved.
Advanced usage for the store
ccc_hsm allows one to set special hints on a file to indicate the usage of the file in the future. This will help optimize the system performance and efficiently choose how and when migrations and archival are done.
Warning
Writing rights are required to use hints on a file. You may use hints only on the STORE and SCRATCH filesystems.
This is done by using the command:
ccc_hsm hint <hint> <path>
Multiple hints can be declared in the command line, and they have the following meanings:
--wont-access: The specified data will not be accessed in the near future (incompatible with--will-access)--wont-change: The specified data will not be modified in the near future--no-archive: The specified data should not be archived in the near future--will-access: The specified data will be accessed in the near near future (incompatible with--wont-access)--clear: Remove all previous user hints before applying new ones (if provided)
If no hint is provided, it will display the hint currently attached to the file.
For instance, if you know the file will not be accessed in the near futur, you may use the following command :
$ ccc_hsm hint --wont-access test_dir/test_file1
$ ccc_hsm hint test_dir/test_file1
wont-access
Data management on SCRATCH
ccc_will_purge
ccc_will_purge displays all files to be purged within 15 days. You may use the -d option to change the delay :
ccc_will_purge -d <maximum number of days before the purge>
ccc_hsm
ccc_hsm is a tool designed to manage data among multiple levels of storage devices, from Lustre SDDs/HDDs to an archival system such as HPSS or Phobos.
Warning
The SCRATCH is not a HSM Filesystem
ccc_hsm on the SCRATCH
Display status
ccc_hsm status <file>
You can use the -T option to also display the storage tiers if the file is
online, or its archive id if released.
Here is an example of an output on the scratch:
$ ccc_hsm status -T test_dir/test_file
test_dir/test_file                  online  (hdd)
In this case, the file is on the hard drive (hdd). This is recommended if :
- the files are not accessed often, or more generally if IO performances are not relevant
- the access order is consistent
This pool is also less used and may provide better writing performances when the machine load is heavy.
$ ccc_hsm status -T test_dir/test_file
test_dir/test_file                  online  (flash)
In this case, the file is on the NVME (flash memory). This is recommended if :
- The files are accessed often, in a random order
- The IO performances are crucial to the code
ccc_hsm allows one to set special hints on a file to indicate the usage of the file in the future. This will help optimize the system performance and efficiently choose how and when migrations and archival are done.
Warning
Writing rights are required to use hints on a file. You may use hints only on the STORE and SCRATCH filesystems.
This is done by using the command:
ccc_hsm hint <hint> <path>
Multiple hints can be declared in the command line, and they have the following meanings:
--wont-access: The specified data will not be accessed in the near future (incompatible with--will-access)--wont-change: The specified data will not be modified in the near future--no-archive: The specified data should not be archived in the near future--will-access: The specified data will be accessed in the near near future (incompatible with--wont-access)--clear: Remove all previous user hints before applying new ones (if provided)
If no hint is provided, it will display the hint currently attached to the file.
For instance, if you know the file will not be accessed in the near futur, you may use the following command :
$ ccc_hsm hint --wont-access test_dir/test_file1
$ ccc_hsm hint test_dir/test_file1
wont-access
Large files management
For files larger than 10 Go on the STORE, WORK or SCRATCH, it is recommanded to “strip” the file: Stripping a file consist in dividing it between several Object Storage Targets (OSTs).
In order to strip an existing file you may use the following commands:
lfs setstripe -c <number of stripes> <new path to file>
cp <previous path> <new path to file>
In this command, the -c option specifies the stripe count, which is the number of OSTs that the file will be striped across. In most cases, 2 to 4 stripes are enough to handle large files. In cas your IO patterns are well parallised, with the least amount of conflicts, you may use more stripes. Nevertheless, you may use no more than one OST per 32GB of file and no more than 16 stripes.
Adding striping will increase read/write bandwidth and decrease latency fo large files but will increase the number of requests generated and thus the load on the processor.
For faster striping of the file, you may use the MPIFileUtils command dstripe as described in the MPIFileUtils subsection, in the Paralell IO section.
Once you have run this command, Lustre will automatically distribute the file across the specified number of OSTs. You can confirm that the file is striped across multiple OSTs by checking the output of the lfs getstripe command:
lfs getstripe <new path to file>
This will show you the stripe count, stripe size, and OSTs that the file is striped across.
You may also define the stripping for a directory, which will affect all new files created in it:
lfs setstripe -c <number of stripes><path of directory>
By default, maximum file size is 4TB, stripping allows for bigger files. If needed, you may use the command:
ulimit -f <file size limit>
However its usage is not recommended. In case of need, please send an email to the hotline.
In order to have the best IO performance, you may directly directly stripe your outputs with MPI IO. More details can be found in the I/O section of the official MPI documentation.
Cloud storage with S3 (MinIO)
Presentation
MinIO is a S3 High Performance Object Storage for machine learning, analytics and application data workloads. It allows you to easily store and access large amounts of data with a user-friendly API. It is designed to handle a large volume of data, and ensure that it is always available, reliable and secure. MinIO is ideal for storing any type of unstructured data that can continue to grow.
S3 data spaces
Two kinds of S3 data spaces can be associated with your project:
- A TGCC S3 data space, by default the project name is used, i.e. <shspace>. Only TGCC users of your project can read or write in this S3 data space.
- A PUBLIC S3 data space, by default the project name is used and suffixed “-pub”, i.e. <shspace>-pub. Objects stored in this S3 data space are available from the Internet without authentication. For more details, please refer to the “Public sharing” section.
Prerequisite
In order to use MinIO, you have to be part of an European or GENCI project.
MinIO project management
Project management at the TGCC
First, you can display your S3 project:
$ module avail s3
----------------------- /ccc/etc/modulefiles/environment -----------------------
s3/info  s3/<shspace>  s3/<shspace>-pub
In order to use MinIO, you need to load your S3 project module:
$ ml s3
This module can not be load!
You can display more informations with 'module help s3/info' command.

$ ml help s3/info
-------------------------------------------------------------------
Module Specific Help for /ccc/etc/modulefiles/environment/s3/info:

##### S3 MODULES INFO #####

1. List your s3 modules with 'module avail s3':
 s3/<shspace>  s3/<shspace>-pub

2. Load your project associated module with 'module load s3/<shspace>'

3. Use 'mc' command with $CCCS3DIR or $<shspace>_CCCS3DIR:
 $ mc ls $CCCS3DIR

For any question, please contact your hotline.
-------------------------------------------------------------------

$ ml s3/<shspace>
load module miniocli/2022.12.02
===
MINIO_ACCESS_KEY_ID, MINIO_SECRET_ACCESS_KEY and MINIO_SESSION_TOKEN variables are available!
===
load module minio/2024.05.09
Variables MINIO_ACCESS_KEY_ID, MINIO_SECRET_ACCESS_KEY and MINIO_SESSION_TOKEN are available. You need theses variables to set-up your minio-py API client.
Project management from an authorized connection point
Get the following files script provided by TGCC:
cea_s3_token_[eu-fr].sh
For GENCI projects:
$ curl  "https://data-pub-fr.ccc.cea.fr/?container=public_resources&object=cea_s3_token_fr.sh" --output cea_s3_token_fr.sh
$ source cea_s3_token_fr.sh token
For European projects:
$ curl  "https://data-pub-eu.ccc.cea.fr/?container=public_resources&object=cea_s3_token_eu.sh" --output cea_s3_token_eu.sh
$ source cea_s3_token_eu.sh token
S3 usage
Informations and statistics
You can display various informations of your account, container or objects with the mc command:
$ mc ls $CCCS3DIR/
$ mc stat $CCCS3DIR/bucket1
Uploads and dowloads
Upload files and directories to a given container.
$ mc mb $CCCS3DIR/mynewbucket
$ mc cp source_file1.txt $CCCS3DIR/mynewbucket/
Download all files in a container
$ mc cp --recursive $CCCS3DIR/mynewbucket/ ./
Download a file in a container
$ mc cp $CCCS3DIR/mynewbucket/source_file1.txt ./
Suppression
Delete files in a container
$ mc rm $CCCS3DIR/mynewbucket/source_file1.txt
Delete a file in a container
$ mc rb $CCCS3DIR/mynewbucket
Sharing your project
Authentified sharing
In order to share your files with people in your community, you need to send a mail to the hotline.
Public sharing
If you want to make your files public, you may also make a request to the hotline. Then anyone can access your files without authentication in read-only with the following command:
For GENCI projects:
Read Object
$ curl "https://data-pub-fr.ccc.cea.fr/get?container=test1&object=test2/picture.png" --output picture.png
List bucket
$ curl "https://data-pub-fr.ccc.cea.fr/list?container=test1
For European projects:
Read Object
$ curl "https://data-pub-eu.ccc.cea.fr/get?container=test1&object=test2/picture.png" --output picture.png
List bucket
$ curl "https://data-pub-eu.ccc.cea.fr/list?container=test1